
I'm sure you all have used LanceDB on Colab a lot, building complex RAG applications and proofs of concept. But often, when it comes to building these applications in production, we might need to store these embeddings somewhere on the cloud for data security and faster performance. I have worked with many clients, and the majority of them preferred Azure services over AWS, especially enterprise clients. That's when I thought, why not use LanceDB with Azure instead of building it locally? And how about building something combining this feature?
In this blog, we'll build an interesting application to map speakers based on their voices using vector similarity and store voice embeddings in an Azure Blob Storage. We'll develop an application that generates speaker-based transcriptions, mapping each speaker to their correct label from a known database. To be more specific, we will create a speaker-mapped RTTM file, which can be used to generate more accurate transcripts.
We'll go step by step, starting with creating audio embeddings, building a database of known speakers, and then moving towards Whisper and Nemo-MSDD diarization to identify speakers and map them accurately. Let's go!
How to use Azure Blob as an object store for LanceDB?
Before we move on to building our application, I think it'd be helpful to understand how to connect LanceDB with Azure blob. It might seem a bit detailed, but it's essential for building our speaker-mapped transcription.
Currently, LanceDB supports integration with all major cloud storage providers as object stores, including AWS, Azure, and Google Cloud. It also has its own cloud version in beta and offers an enterprise version for full control over data and format. Depending on your use case, you can choose the most suitable option.
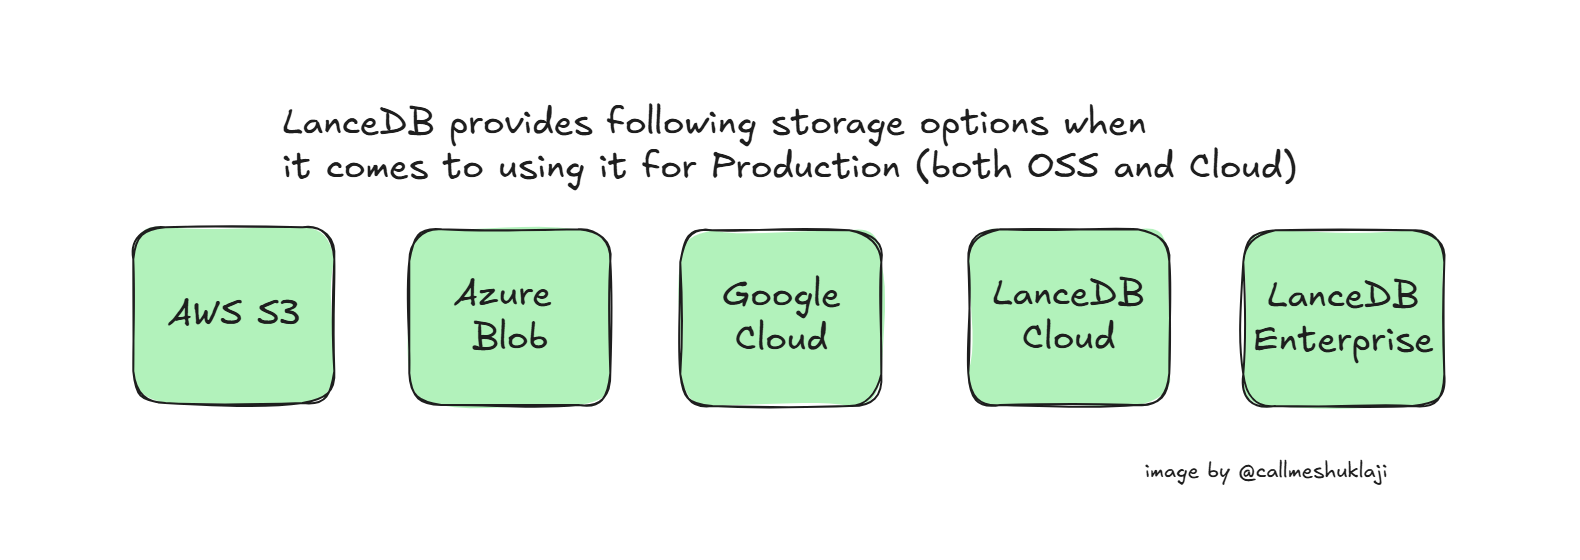
You can opt for other cloud storage solutions if you want to use the OSS version. There is detailed documentation available on choosing the best storage options for your LanceDB setup.
Today, we'll focus on using the OSS version with Azure Blob Storage, as it is widely used among enterprises. I wanted to write about using LanceDB with Azure since there is very little content available on this topic on the internet.
When connecting with Azure Blob, most of the code remains similar to what you would use when building on Colab. However, now we need to connect our container to the storage account of Azure Blob. Storing embeddings on cloud storage after creation is essential to reduce computation overhead during development and production.
Let's do this step by step. The first step is to define the following details in your environment variables. If you are working on Azure and using it in production, Azure App Services allows you to store environment variables there. If you are working in a notebook, say Colab, which I'll also be using for this demo, you can use the following code to save your storage account details there.
import os
os.environ["AZURE_STORAGE_ACCOUNT_NAME"] = <your storage account name>
os.environ["AZURE_STORAGE_ACCOUNT_KEY"] = <your storage account key>
It is crucial to do this as your very first step because if you don’t, there’s a possibility that LanceDB won’t get the account credentials properly, even if you pass them inside the "storage_options" parameter as shown in the documentation. Adding these details with the correct parameter names is a must for establishing a connection with Azure Blob. (you don't need to pass storage_options if using env variables)
Once you do this, the next step is to connect to the container. You need to pass the container name as a parameter and use the following code to establish the connection–
# installing ncessary libraries
!pip install adlfs lancedb

import lancedb

AZURE_BLOB_CONTAINER = "externaldata" #name of the container

# Define the LanceDB path in Azure Blob. You can pass this variable as path.
lance_db_path = f"abfs://{AZURE_BLOB_CONTAINER}/lancedb/" #we didn't use this path but you can replace it in next line.

# Connect to LanceDB with Azure Blob Storage as Object Store. Async Method
db = await lancedb.connect_async(f"az://{AZURE_BLOB_CONTAINER}/lancedb/")

#Sync Connection - Both method works. You can test it on both.
# db = lancedb.connect(f"az://{AZURE_BLOB_CONTAINER}/lancedb/")

# Check connection
print("Connected to LanceDB on Azure Blob Storage!")
Note that when connecting to Azure, LanceDB provides both synchronous and asynchronous API connections. You need to use different methods to validate whether everything is working or not.
Once you complete the above step using either the synchronous or asynchronous method, you are now ready to create your table there. Let's create a simple table to see if everything is working correctly. (I'm assuming an asynchronous API connection for now.)
import pandas as pd

table_name = "testing"

df = pd.DataFrame({
    "text": "Hello, my name is Shresth",  #this is just for example
    "vector": [[23, 45, 6, 7, 8, 8, 8, 923, 3, 3, 3, 3]]  # Nested list structure to represent vector values correctly.
})

db.create_table(table_name, data=df, mode="overwrite")
# The table with the same name will be overwritten when we rerun the query with another text.
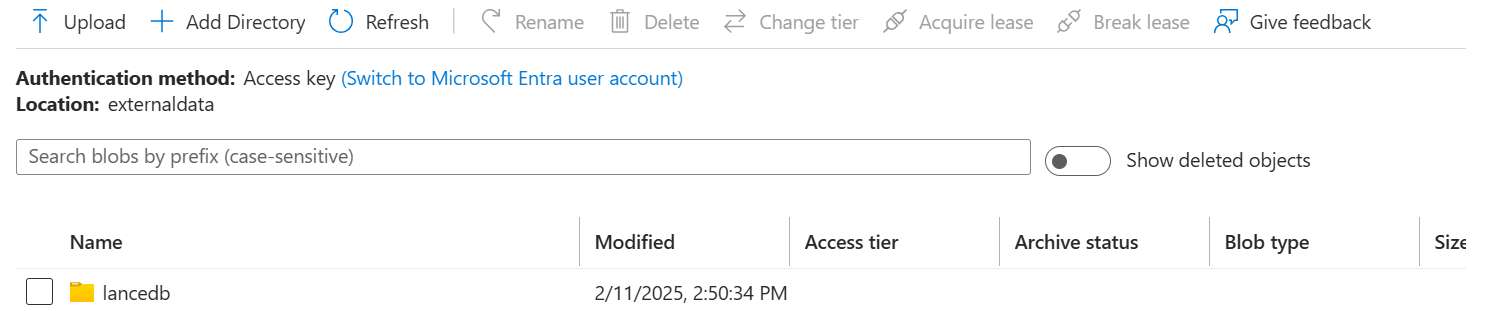
If there are no restrictions on your blob account, you might be able to perform these basic operations on the blob directly. If you get any read/write error, you might need to check the permissions of your blob storage in this section. Make sure it is either enabled for all networks or that your IP is configured correctly, especially when using colab for development purposes –

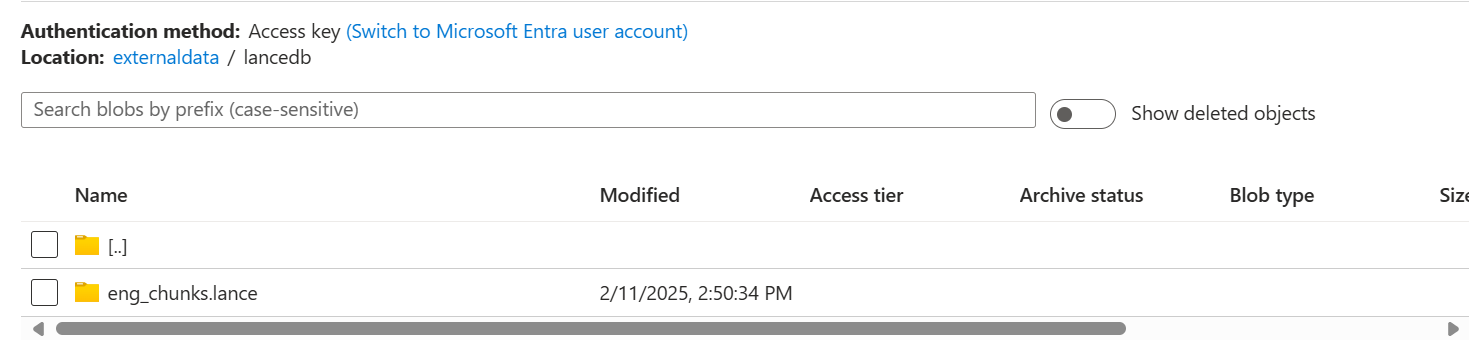
The above code will help you create a "lancedb" folder in your blob storage account, and inside that folder, you can see the .lance file we just created.
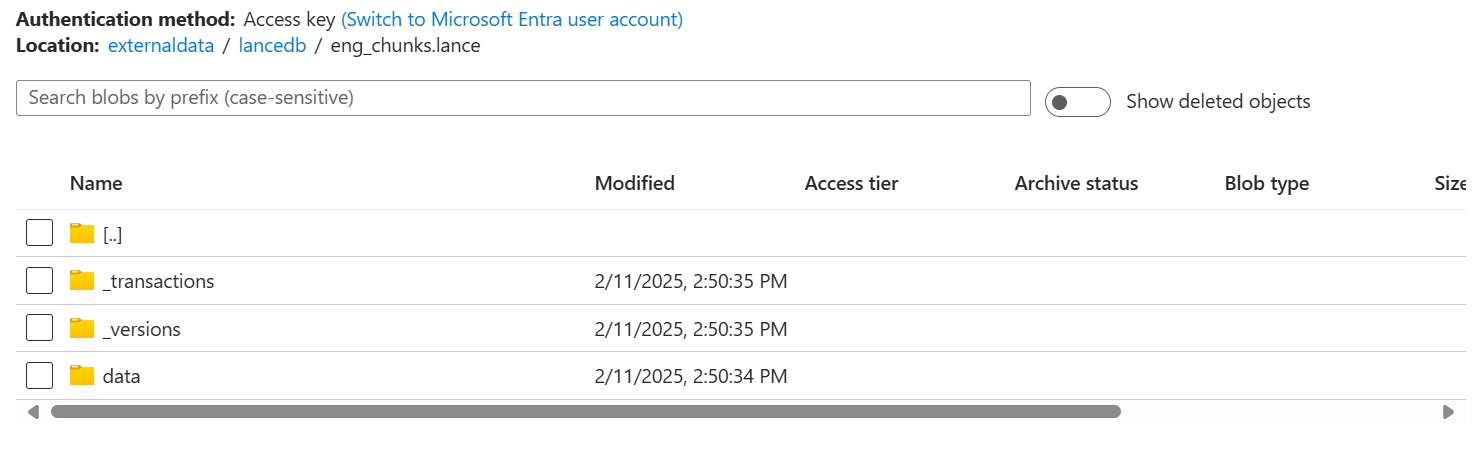
Note that some improvements are still being made to establish Azure connections with LanceDB. However, once you set up the connection as shown in the code above, you'll be able to read and write your vectors to your blob storage. Also, note that once created, they will remain there inside the container, and you can connect to them later to query anytime.
You can use the following code to see the results. In the case of an asynchronous connection, you might need to convert your output to either PyArrow or Pandas format to visualize the content. When using a synchronous connection, a simple to_list() the method also works.
#to print result of asysn connection

table = await db.open_table("eng_chunks")
# Finally, print out the data in the table

print(table)

arrow_table = await table.to_pandas()
print(arrow_table)

#to print result of sync connnection, you need to use the search method. the following code needs to be used.

print(table.search().to_list())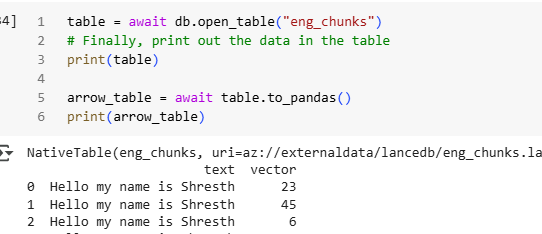
And yes, not just on Colab—if you're taking this to production, you can do similar testing on VS Code to check if the connection works properly.
You need to follow the same steps and load the environment variables before making a connection. (You don't need to pass storage_options as a parameter)


Building Speaker Mapped Transcription using Vector Search
Now that we know how to connect LanceDB with Azure, let's build an interesting application by combining this feature. These days, we see different models being used for transcription. A common use case is generating a transcription of a meeting recording. Companies often have internal meetings and create minutes of the meeting afterward. Don't you think we can automate this?
Well, people have already started doing it. The main challenge is getting the transcription right. While transcription itself has been automated, there's a catch—most meeting transcriptions don’t include the speaker's name, just the timestamp (unless you partner with the tool providers, which obviously many don't xd).

Generally, models provide a transcript, but we never know who is actually speaking those words and sentences. That’s where diarization comes in. Speaker diarization is the process of separating an audio signal into different segments based on who is speaking at any given time.
It helps identify the number of speakers in the audio (in simple terms). So, if your meeting has three members, diarization models can map transcriptions to these speakers. But there's a small problem—while diarization can detect the probable number of speakers, it can't tell who is speaking unless we provide that information externally. This is where vector search and vector databases come in.
You can have a database of known speakers, typically employees in a company, and use it to compare voices in a meeting to accurately map each speaker with their name. There's no need to train a separate speaker identification model for this. Instead, you can simply create embeddings and use them to find the correct match. The best part? You don’t need to generate embeddings multiple times—only when adding new speakers to the database (for example when a new candidate joins the company). This can be managed through a separate pipeline.
Ready to test this? Here's what we'll do to validate our approach–
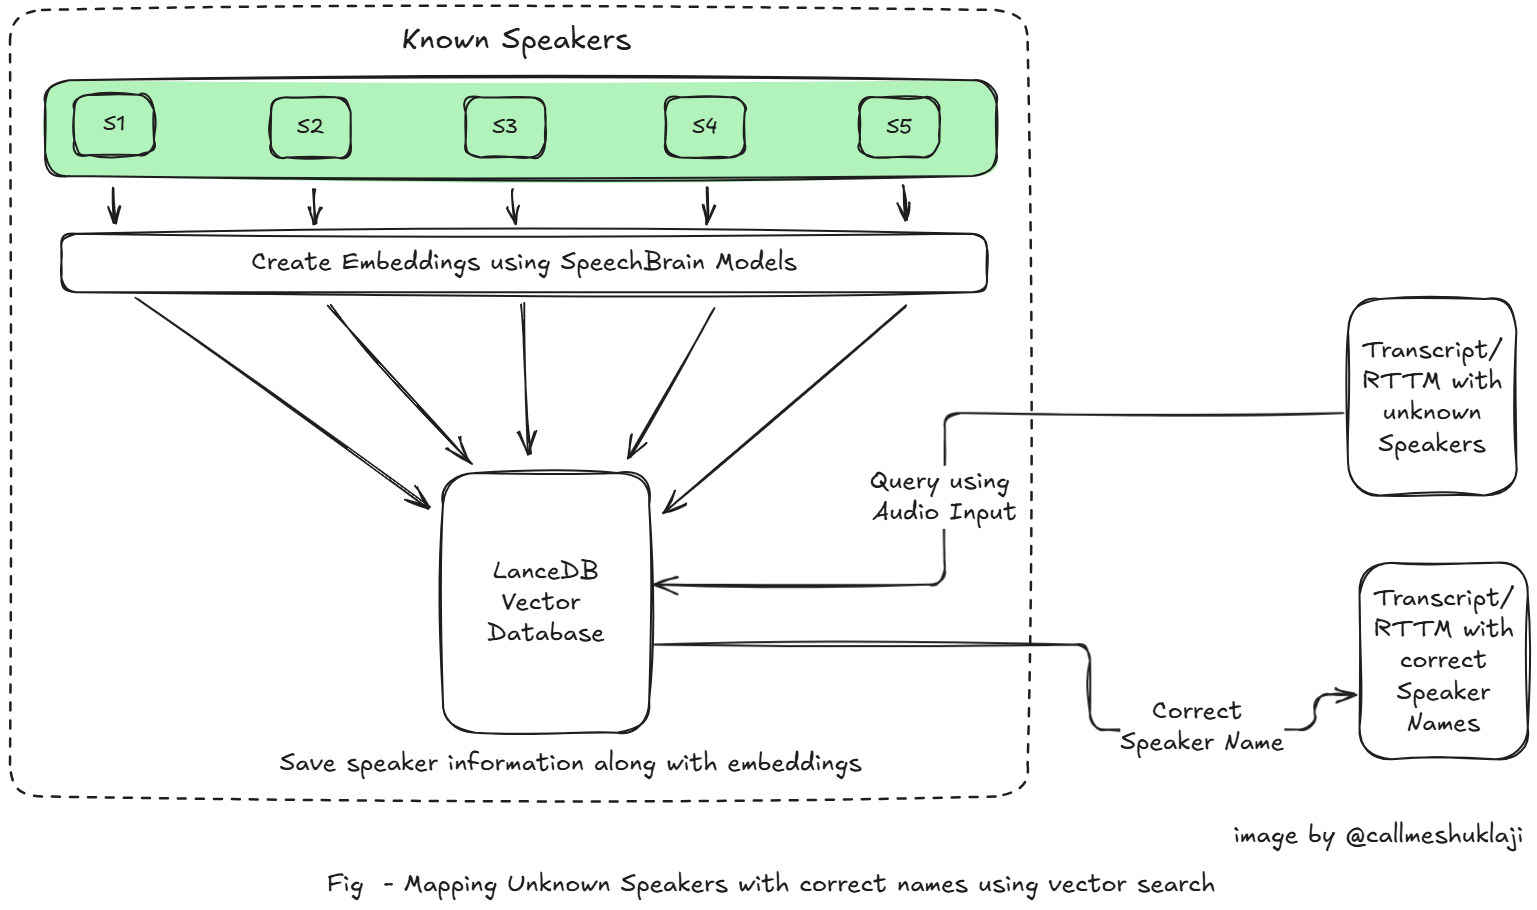
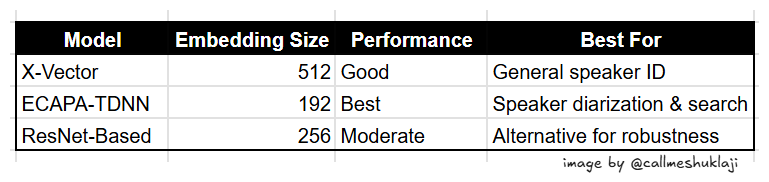
We'll take 3-4 voice samples from different speakers, create their embeddings, and store them in our LanceDB vector database with Azure Blob as Object Store. For this, we'll use an open-source audio embedding model by SpeechBrain. It offers three major models, and ECAPA-TDNN might be the best fit for our needs in this case. There are also paid models available like of TwelveLabs.
Here's the code on how to do this –
#!pip install torchaudio speechbrain lancedb numpy
import torchaudio
import speechbrain
from speechbrain.inference import SpeakerRecognition
import lancedb
import numpy as np
import pandas as pd
import pyarrow as pa
import os
os.environ["AZURE_STORAGE_ACCOUNT_NAME"] = "<your_storage_account_name>"
os.environ["AZURE_STORAGE_ACCOUNT_KEY"] = "<your_account_access_key>"
#note that you can add other parameters supported in similar manner as env variables.
# Load the Speaker Recognition model
model = SpeakerRecognition.from_hparams(source="speechbrain/spkrec-ecapa-voxceleb",
savedir="tmp_model")
def get_embedding(audio_path):
"""Extracts speaker embedding from an audio file"""
signal, fs = torchaudio.load(audio_path)
# Convert stereo to mono (if needed)
if signal.shape[0] > 1:
signal = torch.mean(signal, dim=0, keepdim=True) # Average both channels
embedding = model.encode_batch(signal).squeeze().detach().cpu().numpy()
return embedding.flatten().tolist() # Convert to list for Lancedb storage
# Initialize LanceDB with Azure blob
AZURE_BLOB_CONTAINER = "externaldata"
db = lancedb.connect(f"az://{AZURE_BLOB_CONTAINER}/lancedb/")
# Check connection
print("Connected to LanceDB on Azure Blob Storage!")
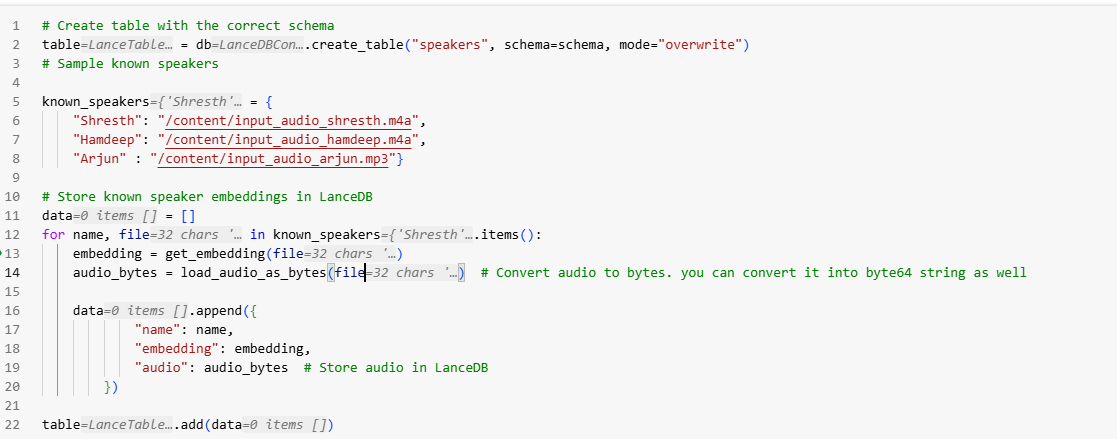
# Define schema with audio storage
schema = pa.schema([
("name", pa.string()),
("embedding", pa.list_(pa.float32(), 192)), # 192-dimensional embedding
("audio", pa.binary()) # Store raw audio bytes
])
def load_audio_as_bytes(audio_path):
"""Reads an audio file and converts it to bytes"""
with open(audio_path, "rb") as f:
return f.read()
# Create table with the correct schema
table = db.create_table("speakers", schema=schema, mode="overwrite")
# Sample known speakers
known_speakers = {
"Shresth": "/content/input_audio_shresth.m4a",
"Rahul": "/content/input_audio_rahul.m4a",
"Arjun" : "/content/input_audio_arjun.mp3"}
# Store known speaker embeddings in LanceDB
data = []
for name, file in known_speakers.items():
embedding = get_embedding(file)
audio_bytes = load_audio_as_bytes(file) # Convert audio to bytes. you can convert it into byte64 string as well
data.append({
"name": name,
"embedding": embedding,
"audio": audio_bytes # Store audio in LanceDB
})
table.add(data)If you run this code on Colab, you'll see a screen like this and can validate whether the connections are correct or not–
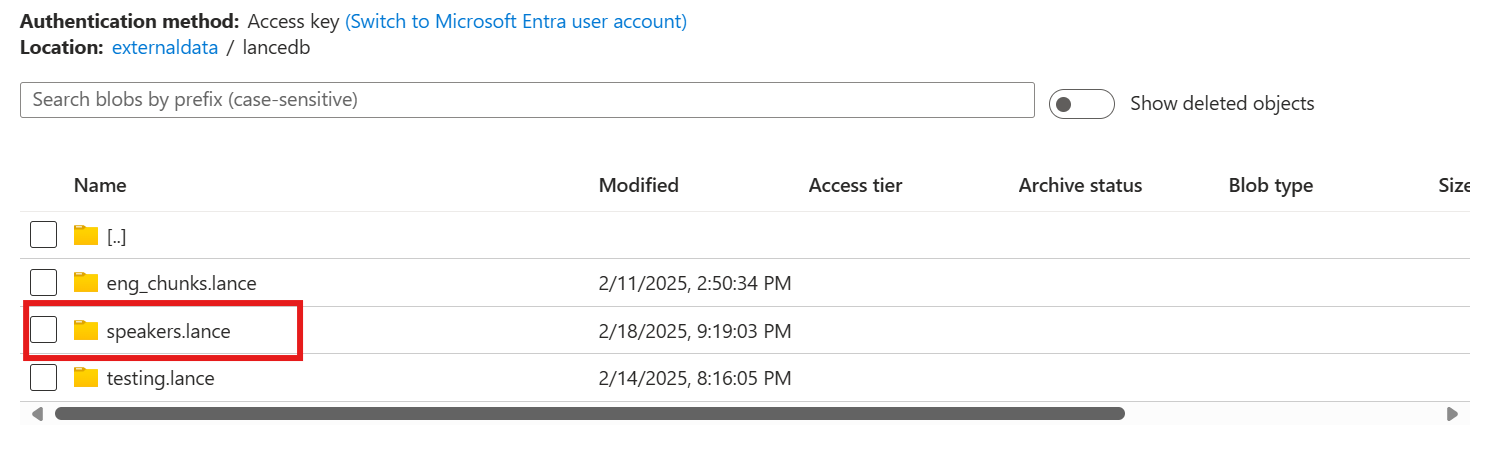
On your Azure Blob Storage, you can see a new Lance file named "speakers" that we just created –
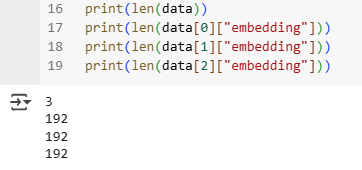
Since we can store both audio and its embedding in LanceDB, we have designed our schema accordingly. If you have prepared this dataset in the cloud, you can also pass blob URL here as metadata if you don't want to store the full audio in the LanceDB. The models we used generate an embedding vector of size 192 in this case.
Now we have completed the major part. The next step is to query this database using an audio input to identify speakers. This is when you should think about your use case again.
For building a meeting transcription tool that converts audio or video recordings into a well-structured transcript with accurate speaker names. Can you think of how you’d approach this? Plenty of tools and techniques are available for different stages of the process. For example:
- Whisper is great for transcription.
- Demucs help separate speech from background music and noise, improving transcription and diarization accuracy.
- WhisperX also helps with forced alignment to generate precise timestamps.
- NeMo MSDD performs best for speaker diarization.
- Punctuation-based realignment improves readability and structure.
- And many more depending on your use case and requirements.
I have found a resource that can help you with transcription, diarization, and related processing tasks.

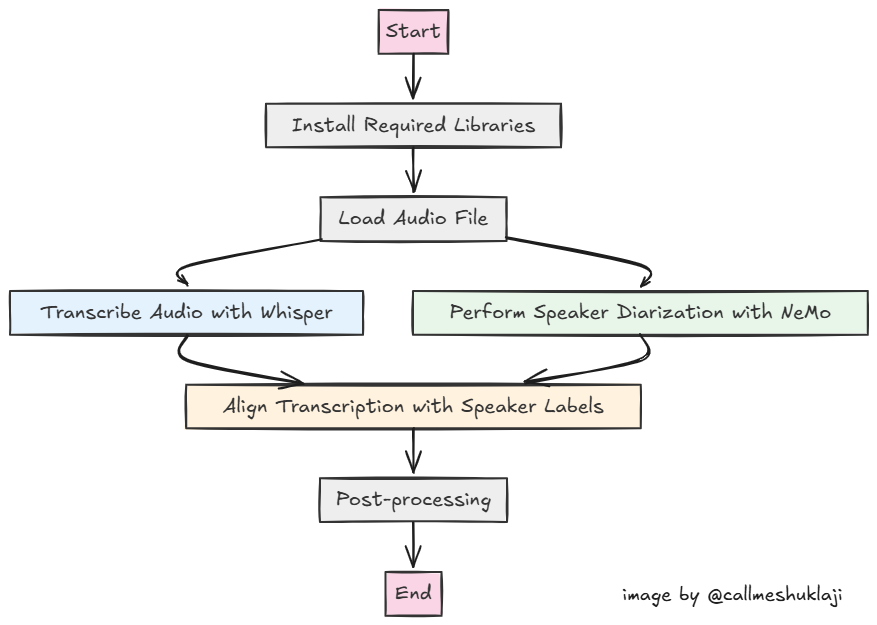
Here's what a general flow would look like for our current application – We'll load our audio file, which could be a meeting recording or any audio for which you want a transcription. We transcribe this using OpenAI's Whisper model. After the transcription, we convert the audio to mono format and pass it to Nemo MSDD's diarization model to create a speaker-timestamp distribution. This can then be used to map words and sentences to each speaker based on these timestamps.
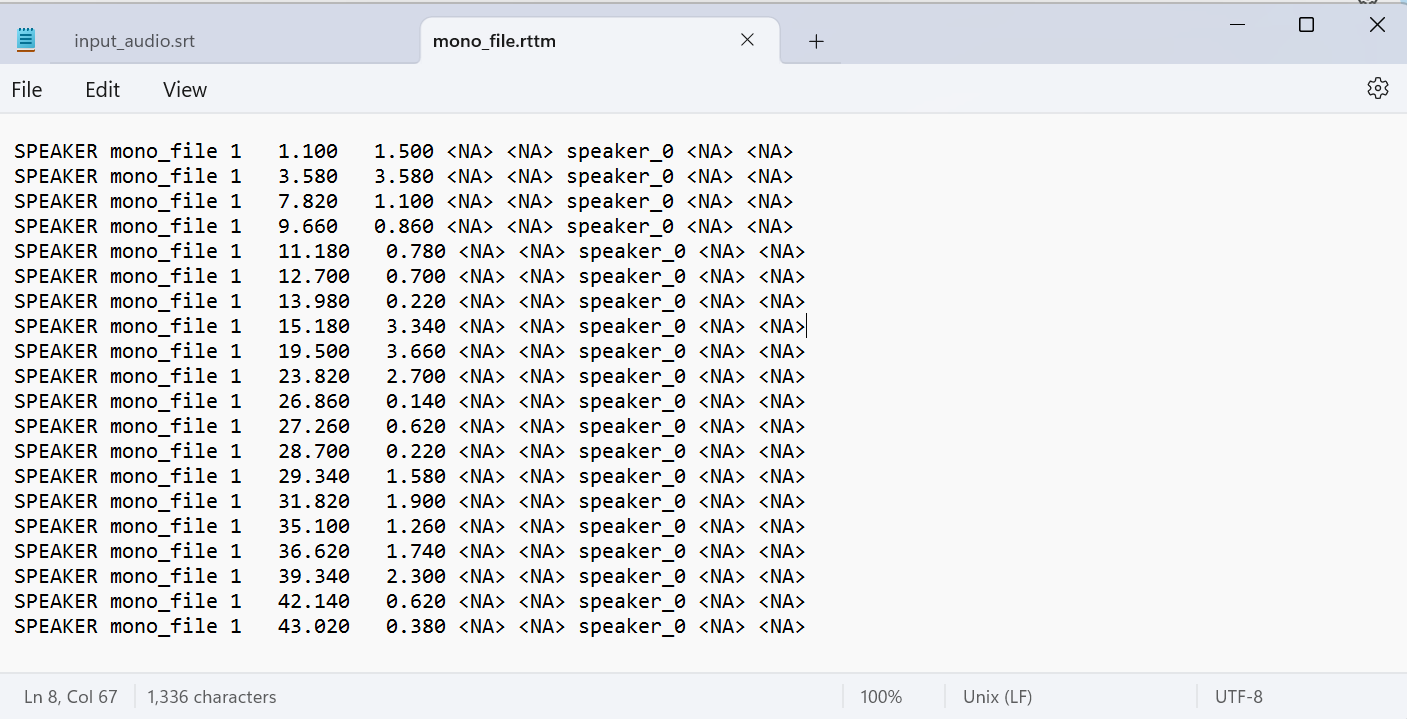
At which step do you think we can include this vector search capability to map speakers with the correct names? Right after we get the diarization output. NeMo MSDD provides speaker mappings in a format like this. It generates an RTTM(Rich Transcription Time Marked) file with speaker predictions along with timestamps.
You can get this diarized output simply by passing your audio file in mono WAV format to Nemo MSDD's NeuralDiarizer() function.
Here's a code snippet to use Nemo-MSDD for diarization –
#this is part of code and does not run independently. please refer to colab for complete code.

#converting to mono for nemo compatibility.

ROOT = os.getcwd()
temp_path = os.path.join(ROOT, "temp_outputs")
os.makedirs(temp_path, exist_ok=True)
torchaudio.save(
    os.path.join(temp_path, "mono_file.wav"),
    audio_waveform.cpu().unsqueeze(0).float(),
    16000,
    channels_first=True)


# Initialize NeMo MSDD diarization model. #Once you run this code, you'll get your RTTM file in the temp_outputs folder.
#It is a time taking step and can be speed up with better infra if you are taking this for production. Or you can chose to use APIs for this.

temp_path = "temp_outputs"
msdd_model = NeuralDiarizer(cfg=create_config(temp_path)) #.to("cuda")
msdd_model.diarize()

del msdd_model
torch.cuda.empty_cache()
After word and speaker mapping and alignment, the final output looks like this (without speaker names). We can replace speaker IDs with their correct names at this stage(after RTTM) or after obtaining the final transcript—both approaches work, but using the RTTM file is the preferred choice.
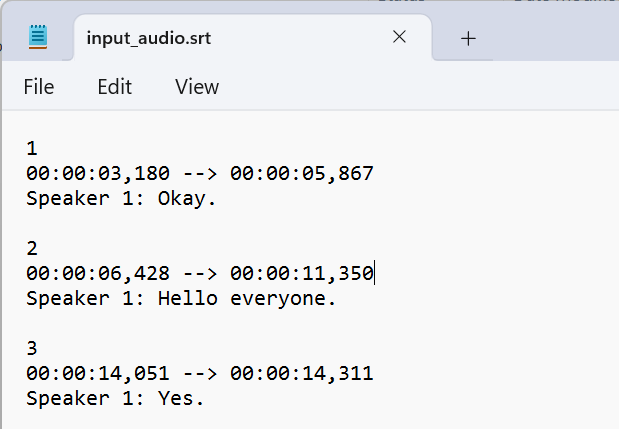
We can see that it works perfectly, but we don’t just need these speaker IDs—we want our transcript to have the correct names of the speakers, right?
We can extract audio for different speakers and use it to compare with our vector database. How do we do that? It's simple. You can extract audio for a particular speaker from the original audio using the diarization output (RTTM file) and compare it with known speakers. You don't need the full audio—just a 10-second clip per speaker is enough for the search to work. Now our flow would look something like this –
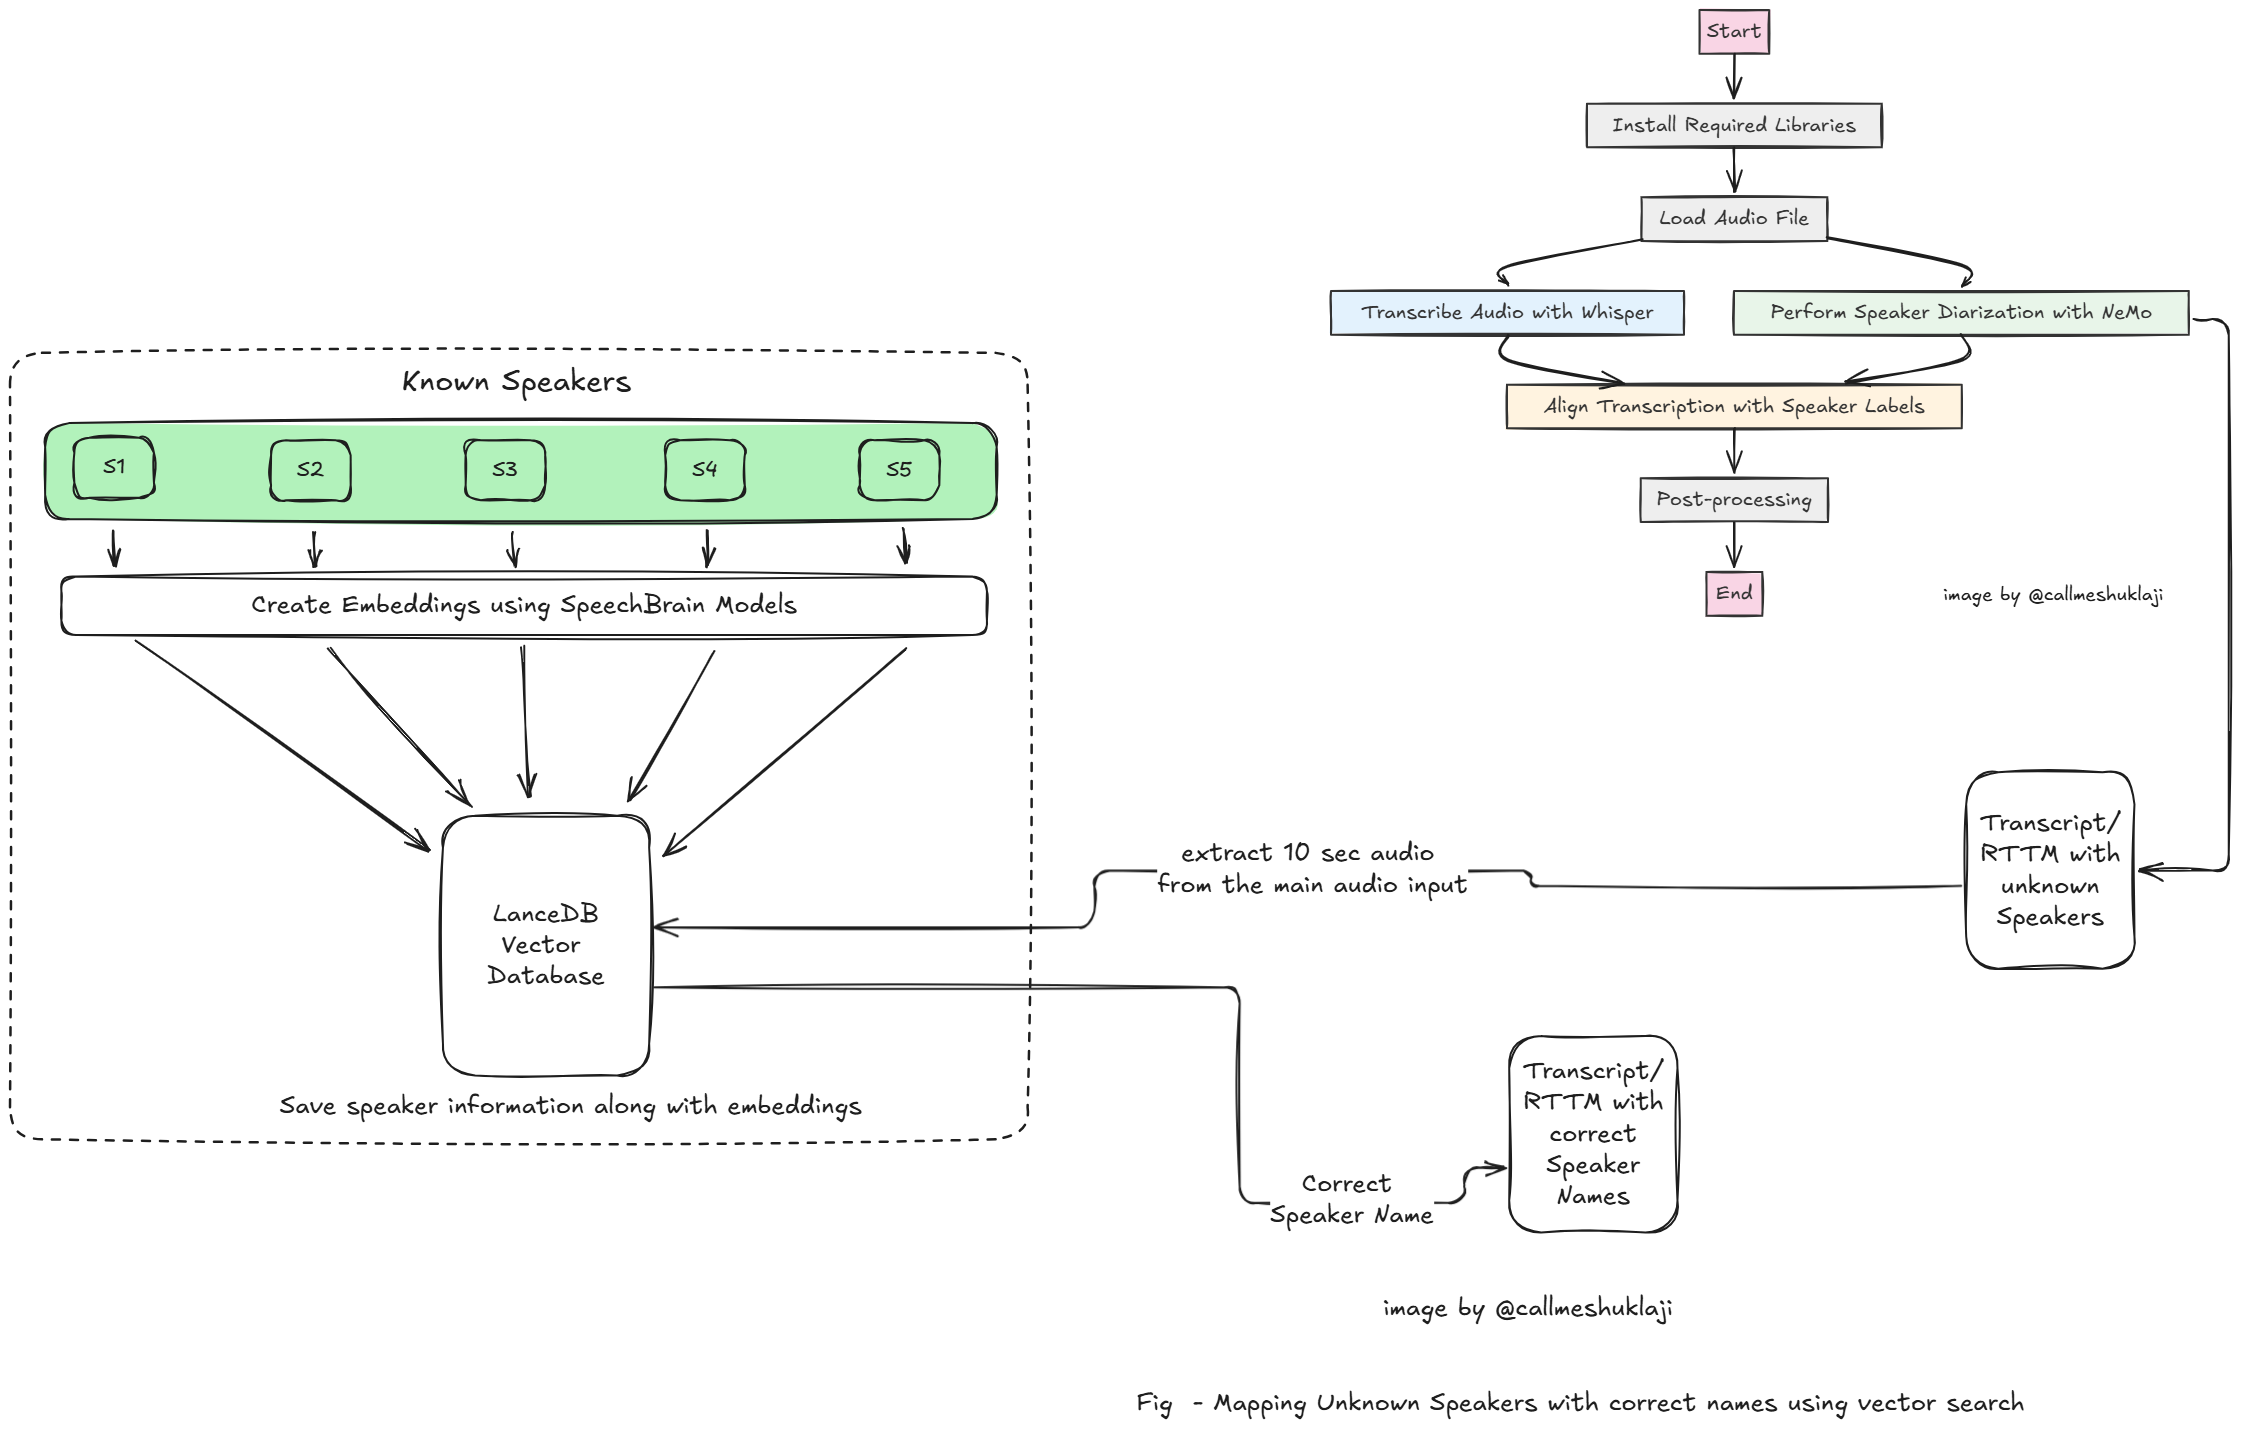
You can extract the first 10 seconds for each speaker from your RTTM file using this code:
#refer to colab for complete code

from pydub import AudioSegment

# Path to input audio
audio_path = audio_path

# Load audio file
audio = AudioSegment.from_file(audio_path)

# Read RTTM file and extract timestamps
rttm_file = "/content/temp_outputs/pred_rttms/mono_file.rttm"

speaker_segments = {}

with open(rttm_file, "r") as f:
    for line in f:
        parts = line.strip().split()
        if len(parts) >= 8:
            speaker = parts[7]  # Speaker ID (e.g., spk_0)
            start_time = float(parts[3]) * 1000  # Convert sec → milliseconds
            duration = float(parts[4]) * 1000  # Convert sec → milliseconds
            end_time = start_time + duration

            # Store segments for each speaker
            if speaker not in speaker_segments:
                speaker_segments[speaker] = []

            speaker_segments[speaker].append((start_time, end_time))

# Process first 10 seconds for each speaker
for speaker, segments in speaker_segments.items():
    speaker_audio = AudioSegment.silent(duration=0)  # Empty audio segment
    total_duration = 0

    for start_time, end_time in segments:
        segment_duration = min(end_time - start_time, 10_000 - total_duration)  # Limit to 10 sec
        speaker_audio += audio[start_time:start_time + segment_duration]
        total_duration += segment_duration
        if total_duration >= 10_000:  # Stop at 10 seconds
            break

    # Save speaker's first 10 seconds
    if total_duration > 0:
        output_filename = f"{speaker}_first_10s.wav"
        speaker_audio.export(output_filename, format="wav")
        print(f"Saved {output_filename}")
Once you get the audio clips for all the speakers that the model has predicted, you can use the following code to compare the extracted audio with known speakers. Here, I tested this approach on my audio, which is different from the one used to create the knowledge base.
# Given a new speaker audio sample from the complete audio
query_embedding = get_embedding("/content/testing_audio_shresth.m4a")

# Search in LanceDB and retrieve similarity scores
results = table.search(query_embedding).metric('cosine').limit(1).to_pandas()

# Get the closest match and its similarity score
if not results.empty:
    identified_speaker = results.iloc[0]["name"]
    similarity_score = 1-results.iloc[0]["_distance"]  # Lower distance = better match
    if similarity_score < 0.5:
        identified_speaker = "Unknown"
        print(identified_speaker,"Speaker not found. Similarity score in current dataset - ", similarity_score)

    else:
      print(f"Identified Speaker: {identified_speaker}, Similarity Score: {similarity_score}")
And damn, it works perfectly.

You need to perform this step for all the speakers extracted from the audio and create a mapping of speaker IDs to their actual names. Once your mapping is ready, all you need to do is replace the speaker labels with their correct names. That means replacing "speaker_0" with "Shresth," "speaker_1" with "Arjun," and so on for all the speakers identified in the transcript.
Here's how you can do this with your RTTM file:
#refer to colab for complete code
#assuming you have used above code in loop to create mapping like this after querying from the database.
# You can also hose to create transcription as it is and then replace speakers in final transcript created.

# Define the speaker mapping
speaker_mapping = {
    "speaker_0": "Shresth",
    "speaker_1": "Arjun",
    "speaker_2": "Hamdeep",
    # Add more mappings as needed
}

# Load the RTTM file
rttm_file_path = "/content/temp_outputs/pred_rttms/mono_file.rttm"
output_file_path = "/content/temp_outputs/pred_rttms/updated_mono_file.rttm"

# Read and modify the file line by line
with open(rttm_file_path, "r") as file:
    lines = file.readlines()

# Replace speaker labels while preserving spacing
with open(output_file_path, "w") as file:
    for line in lines:
        parts = line.strip().split()  # Split by whitespace
        if len(parts) > 7 and parts[7] in speaker_mapping:  # Check if column 8 (index 7) is in mapping
            parts[7] = speaker_mapping[parts[7]]  # Replace speaker label
        file.write(" ".join(parts) + "\n")  # Preserve original spacing

print("Modified RTTM file saved successfully!")
This step creates an updated RTTM file, which can be used to align the transcription with speakers and timestamps from Whisper and forced alignment. The notebook contains code for these next steps.
I hope you got the idea of how to proceed with this and build an application that not only performs transcription but also generates a more accurate speaker-mapped transcript while storing audio embeddings in an Azure Blob Storage account. This transcript can then be used by LLMs to create more context-aware notes and summaries. Vector search definitely proves to be the best approach in such cases.
Refer to this notebook for complete code implementation

Star 🌟 LanceDB recipes to keep yourself updated -
